Blocks for ACF Fields is designed to work alongside Advanced Custom Fields (ACF) or Secure Custom Fields (SCF). Before loading fields into the editor, it’s important to understand how fields are created and how the plugin displays them inside the Block Editor.
Creating Your Fields
Before using the plugin, you first need to create your custom fields using ACF or SCF as you normally would. Fields can be assigned to: posts or custom post types, taxonomy terms, users, or options pages.
Unlike traditional ACF Blocks, you do not need to register or assign fields to a specific block. Blocks for ACF Fields works differently — fields remain attached to their normal ACF location rules, and the plugin simply lets you display those fields anywhere inside the editor.
This means you can continue managing your fields exactly the same way you already do in ACF or SCF.
Inserting the Block
Blocks for ACF Fields already includes a flexible block called ACF Field. You do not need to create a separate block for every field type or field group. Instead, the same block can load almost any supported field directly from the editor.
The block can be inserted into:
- Posts and pages
- Custom post types
- Site Editor templates
- Template parts
- Query Loop layouts
- Patterns and reusable blocks
Once inserted, you simply choose which field to display.
Step-by-Step: Loading a Field
Step 1: Create and Assign Your Field
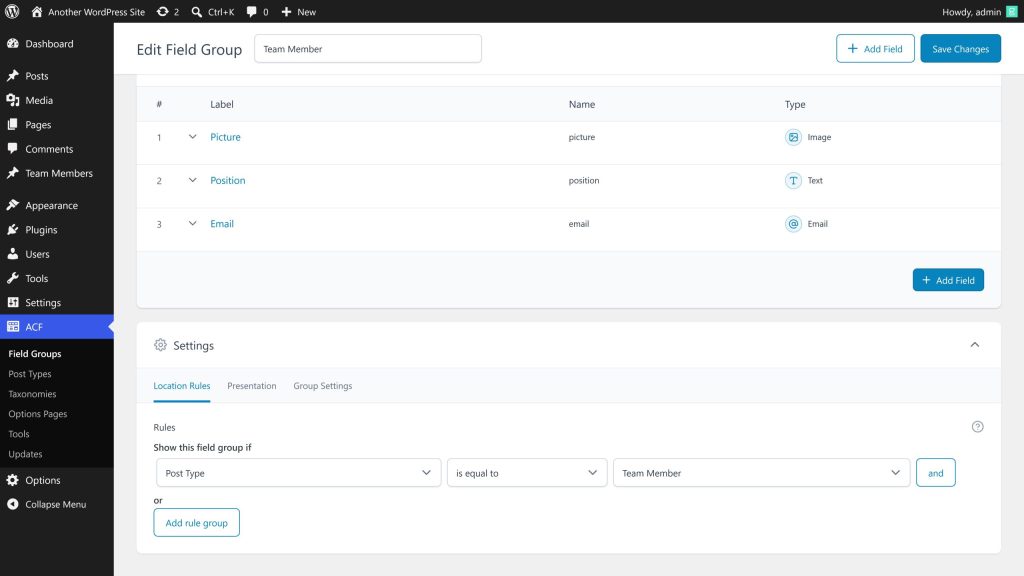
Before loading a field into the editor, you first need to create the field using Advanced Custom Fields (ACF) or Secure Custom Fields (SCF). For this example, create a field group and assign it to a Post post type using the normal ACF location rules.
Some field types in ACF or SCF also include a Return Format setting. For example, Image fields can return an Image Array, Image URL, or Image ID. Normally, this setting affects how developers need to write template code manually.
With Blocks for ACF Fields, you do not need to worry about the return format configuration. The plugin automatically handles the field output internally, so the field can still be displayed correctly regardless of which return format is selected. This allows you to keep your existing field settings without needing additional adjustments specifically for the plugin.
Step 2: Open the Editor
After creating the field, open the WordPress editor where you want to display it. This can be a regular post or page editor, or a template inside the Site Editor.
The plugin works seamlessly in both environments. This means you can use the same field inside individual content pages, archive templates, author templates, reusable patterns, or dynamic Query Loop layouts without changing how the field is configured.
Step 3: Insert the ACF Field Block
Open the block inserter and add the ACF Field block to the editor. This is the main block provided by the plugin and can be used to display almost any supported field type.
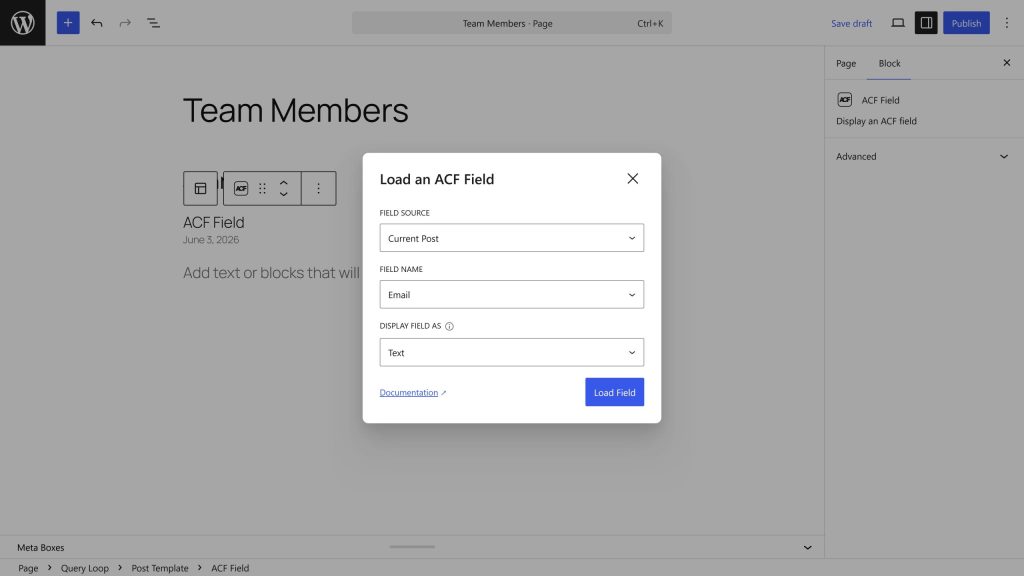
After inserting the block, a setup modal will appear. The modal contains several options:
- Field Source
The first option you need to configure is the Field Source, which determines where the field value should be loaded from. For example, if your field is attached to a post, you can select Current Post. If the field belongs to an options page, taxonomy term, or user profile, you can select the matching source instead. The plugin uses this information to understand which fields are available in the current context. You can learn more about field sources here. - Field Name
Next, select the Field Name you want to display. The field list is loaded dynamically based on the selected field source, so the dropdown will only show fields that are actually available for that source. This helps avoid mistakes and makes field selection much faster, especially on larger projects with many field groups. - Display As
Some field types also include a Display As option. This option appears when a field supports multiple output formats. For example, a URL field can be displayed as plain text, a clickable button, or an embed. Certain field types also unlock additional display formats in the PRO version. The selected display format determines how the field will be rendered both inside the editor and on the frontend. You can learn more about display formats here.
After configuring the available options, click Load Field to insert the field into the editor.
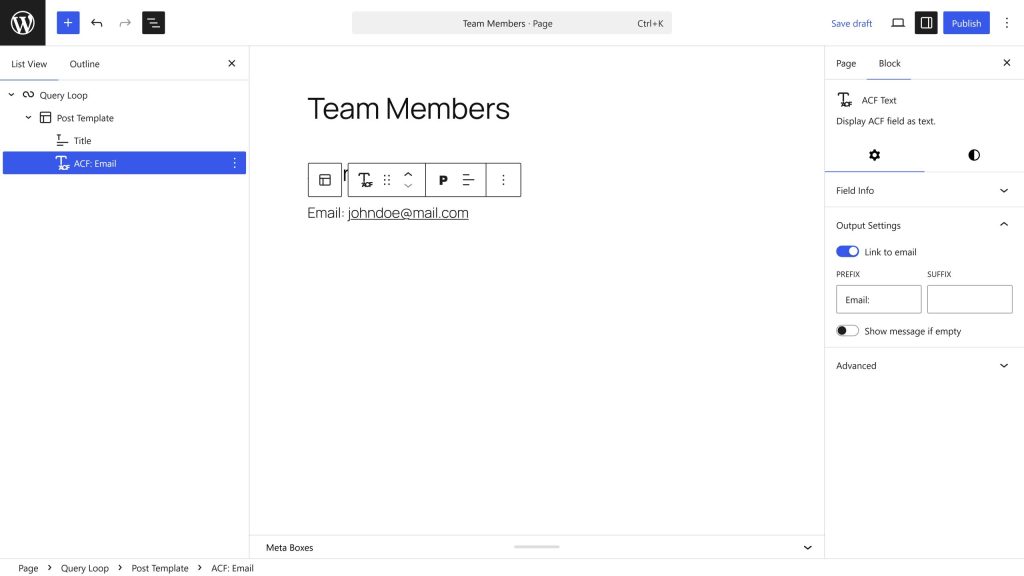
Step 4: Preview the Field in the Editor
Once the field is loaded, the block will immediately appear inside the editor. In many situations, the actual field value can also be previewed directly inside the editing canvas. For example, when editing a post that already contains field data, the plugin can display the real value instantly, allowing you to design layouts visually without needing to switch to the frontend preview.
In other situations, the editor may show a placeholder instead of the real value. This is completely normal and usually happens when editing templates inside the Site Editor, when the field has not been filled yet, or when the final value depends on dynamic frontend context. Even when placeholders are shown, the field will still render correctly on the frontend after the page or template is saved.
If needed, you can save the editor and open the frontend preview to see the final rendered output.
Step 5: Customize the Output (Optional)
After loading the field, you can continue customizing its appearance using the normal WordPress block settings panel. Because the plugin integrates directly with native block controls, styling fields works similarly to styling core WordPress blocks.
Depending on the selected field type and display format, you may be able to adjust typography, colors, spacing, alignment, borders, shadows, image styling, button styles, and other visual settings. This allows you to match the field output with the rest of your site design without needing custom CSS or additional template code.
The available style options may vary depending on how the field is displayed. For example, text-based fields include typography controls, while image-based fields inherit styling options similar to the core Image block.